> ## Documentation Index
> Fetch the complete documentation index at: https://docs.elisainteractive.com/llms.txt
> Use this file to discover all available pages before exploring further.
# Elisa for Unity
> This page will help you use Elisa on Unity from Installation to Prompting with Elisa
## 1. Initial Engine Setup & Plugin Download
### Create a New Unity 6 Project
Using the Unity Hub, create a new **Unity 6** project of your choice.
**Launch the editor** to initialize the engine files.
If you already have a Unity 6 project, you can use it instead.
### Download and Install the Elisa Plugin
Start by **downloading the Elisa Unity Plugin**:
1. Download 👉 [Elisa Unity Plugin ZIP](https://github.com/Elisa-Interactive/ElisaForUnity/releases/latest).
2. **Extract the plugin**, you should end up with a folder named `com.elisainteractive.elisa`.
3. **Open the Package Manager** in Unity.
4. **Install the Elisa Package** from disk by selecting the `package.json` file.
## 2. Request your Elisa API Key
You should have received your **Elisa API key by email**.
If not, you can request access via the Elisa website.\
👉 [Get your Elisa API Key](https://elisainteractive.com/getaccess)
**Copy this key**; you'll need it in the next steps.
## 3. Get a Google API Key
Elisa uses Google for the included **Landscaper agent**:
1. Visit 👉 [Google AI Studio](https://makersuite.google.com/app/apikey).
2. Sign in with your Google account.
3. Create an **API key**.
**Save this key** for later.
## 4. Set your Elisa API Key
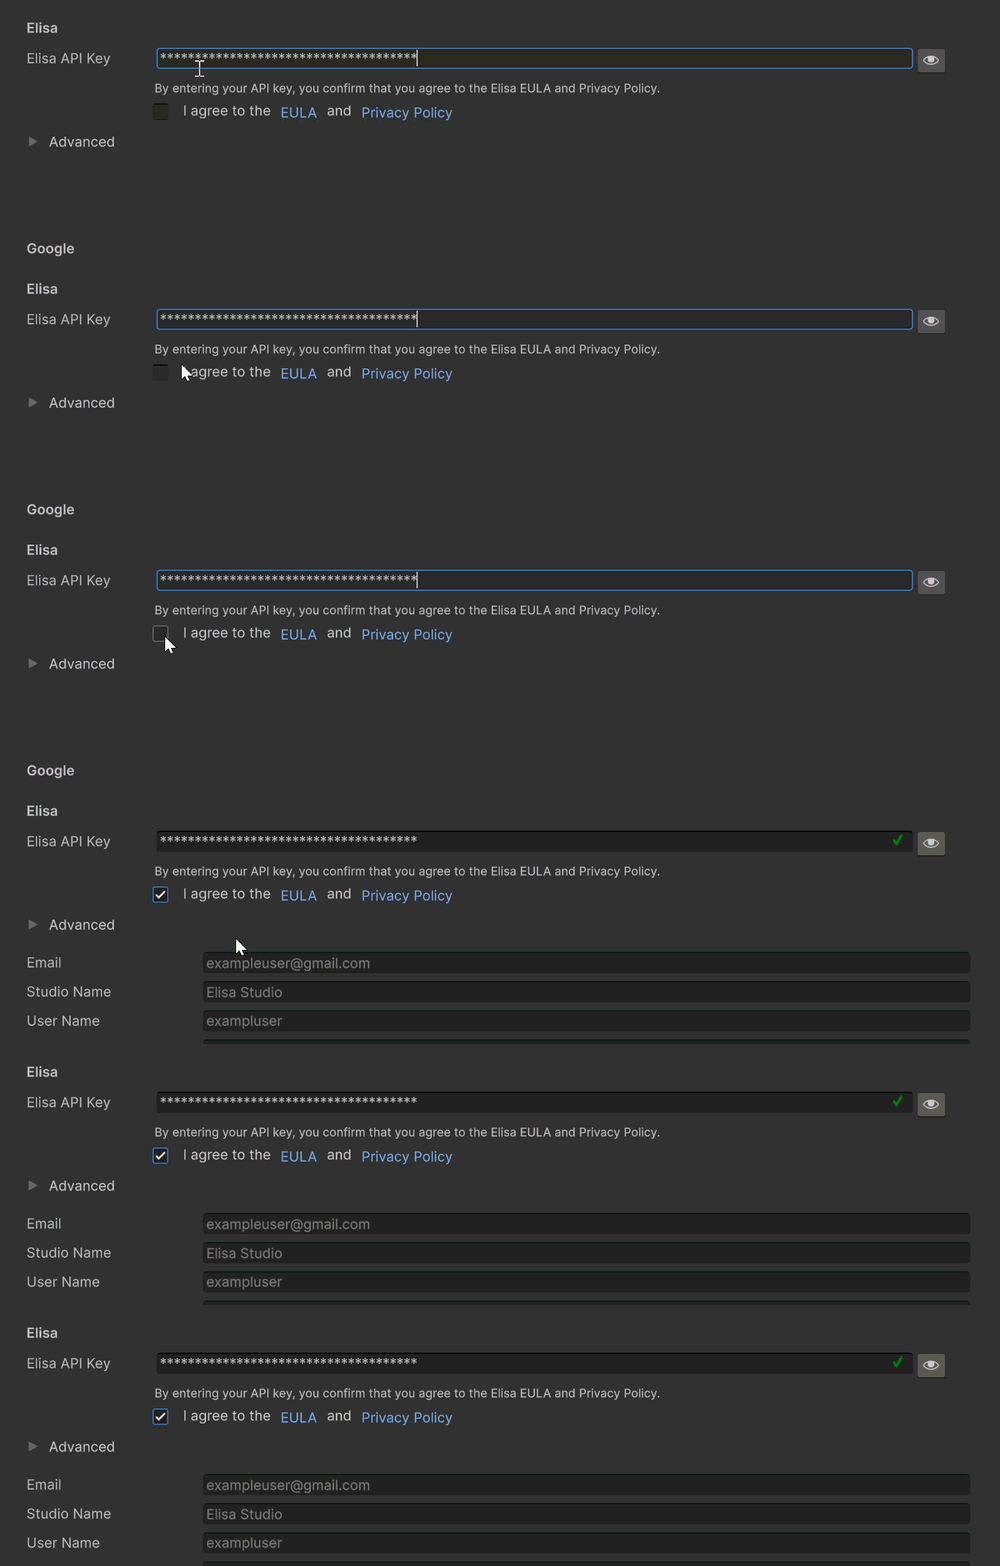
In the engine, open the **Elisa Settings Panel**.
`Edit > Project Settings > Plugins > Elisa`
* Set your **Elisa API Key** there.
* Then press **Enter**.
 ## 5. Set your Google API Key
Still in the **⚙️Elisa Settings**, under the Google category, click **Set your** `Google API key`.
## 5. Set your Google API Key
Still in the **⚙️Elisa Settings**, under the Google category, click **Set your** `Google API key`.
 ## 6. Register a new Project
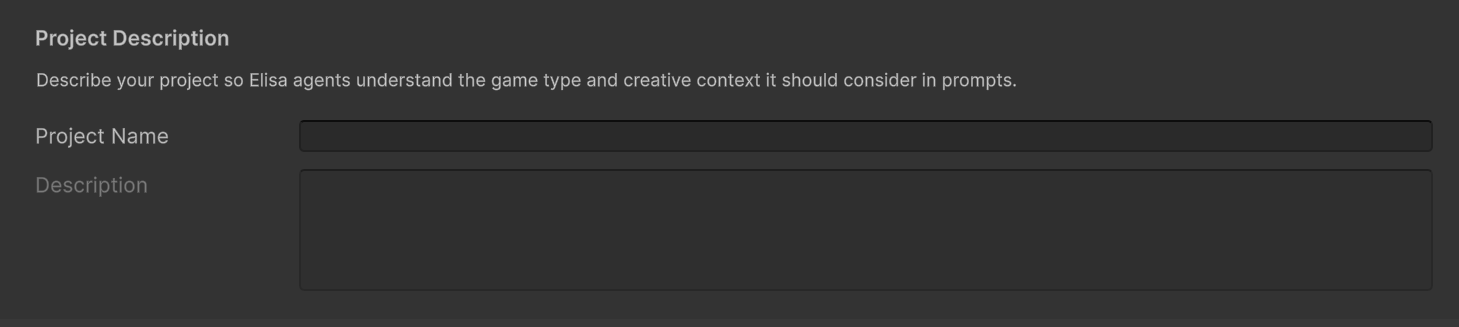
Still in the **⚙️Elisa Settings**, under the Descriptions tab,
* In Project Description, fill in a **Project Name**, then press **Enter**.
* Once your project is registered, fill in the **Description** and press **Enter**.
> The Project Description should include **basic information** about its type, style, and usage.
## 6. Register a new Project
Still in the **⚙️Elisa Settings**, under the Descriptions tab,
* In Project Description, fill in a **Project Name**, then press **Enter**.
* Once your project is registered, fill in the **Description** and press **Enter**.
> The Project Description should include **basic information** about its type, style, and usage.
 ## 7. Generate Your Asset Catalog
Elisa needs a **catalog of assets** from your project in order to understand what it can place. A catalog links **asset metadata** to Elisa's AI system.
If you don't yet have assets in your project, we recommend using the 👉 [**RPG Poly Pack - Lite**](https://assetstore.unity.com/packages/3d/environments/landscapes/rpg-poly-pack-lite-148410).
**To generate a catalog:**
In Catalog management, fill in a catalog **Description** and press **Enter**.
> * This should include key details about the assets **style**, **theme**, and **intended usage**.
# Let an LLM do the writing for you!
Paste your **asset pack URL** into your favorite chat interface and use this prompt:
> *"Analyze every item in the catalog and write 3-5 sentences (60-120 words) that capture their shared stylistic and technical DNA. Cover dominant art styles/eras, modelling techniques, color palette and lighting mood, and any typical functional contexts. Omitting all file paths, IDs, prices, or seller names."*
### **Option 1:**
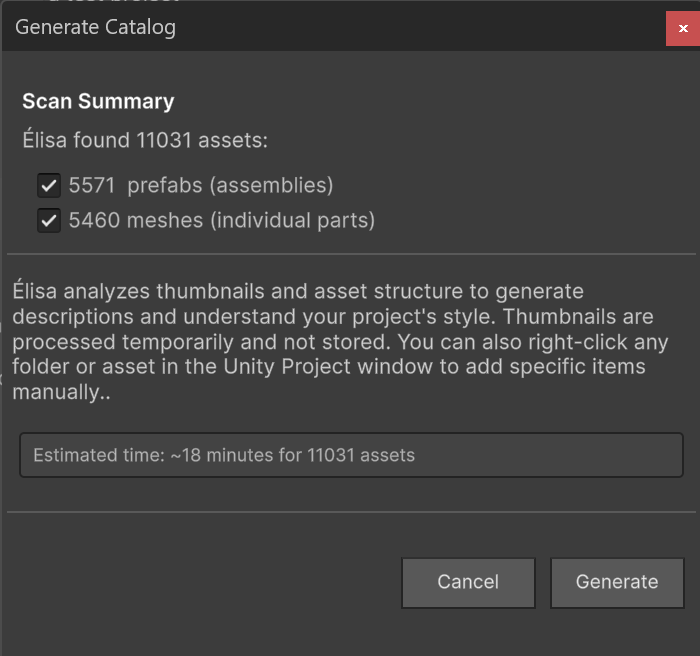
#### 1. Click the **Generate Catalog** button.
* Elisa scans your entire **project files** containing prefabs and meshes.
## 7. Generate Your Asset Catalog
Elisa needs a **catalog of assets** from your project in order to understand what it can place. A catalog links **asset metadata** to Elisa's AI system.
If you don't yet have assets in your project, we recommend using the 👉 [**RPG Poly Pack - Lite**](https://assetstore.unity.com/packages/3d/environments/landscapes/rpg-poly-pack-lite-148410).
**To generate a catalog:**
In Catalog management, fill in a catalog **Description** and press **Enter**.
> * This should include key details about the assets **style**, **theme**, and **intended usage**.
# Let an LLM do the writing for you!
Paste your **asset pack URL** into your favorite chat interface and use this prompt:
> *"Analyze every item in the catalog and write 3-5 sentences (60-120 words) that capture their shared stylistic and technical DNA. Cover dominant art styles/eras, modelling techniques, color palette and lighting mood, and any typical functional contexts. Omitting all file paths, IDs, prices, or seller names."*
### **Option 1:**
#### 1. Click the **Generate Catalog** button.
* Elisa scans your entire **project files** containing prefabs and meshes.
 ### Option 2:
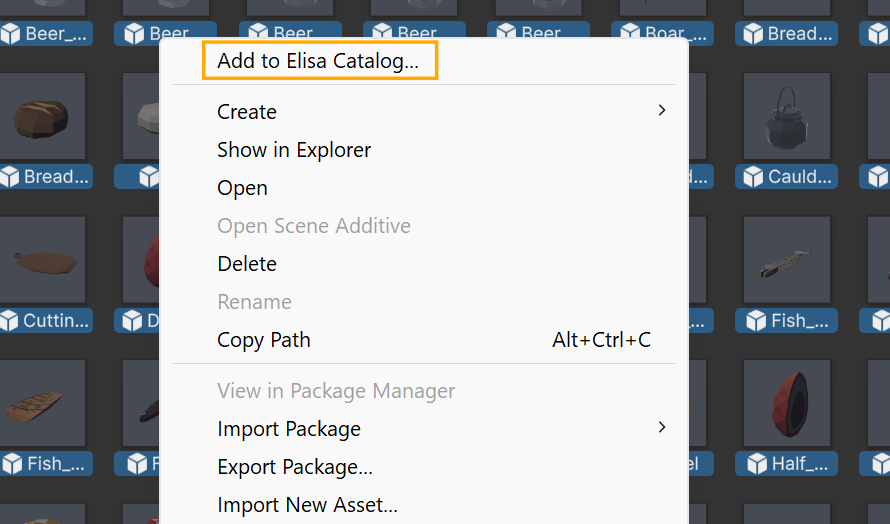
#### **1. Select the assets** you want Élisa to use.
* You can select multiple assets or even entire folders directly in your **Project Files**.
> For more detailed information on what asset you can use, see the [Selecting the right assets](https://docs.elisainteractive.com/essentials/generate-your-catalog#selecting-the-right-assets) page.
#### 2. **Right-click** the selection and choose `Add to Catalog`.
### Option 2:
#### **1. Select the assets** you want Élisa to use.
* You can select multiple assets or even entire folders directly in your **Project Files**.
> For more detailed information on what asset you can use, see the [Selecting the right assets](https://docs.elisainteractive.com/essentials/generate-your-catalog#selecting-the-right-assets) page.
#### 2. **Right-click** the selection and choose `Add to Catalog`.
 # Having issues with catalog generation?
If you're using a free Gemini API key, it may be due to rate or token limits.\
👉[See common solutions here](https://docs.elisainteractive.com/troubleshooting/common-issues)
***
## 8. **Design with Elisa**
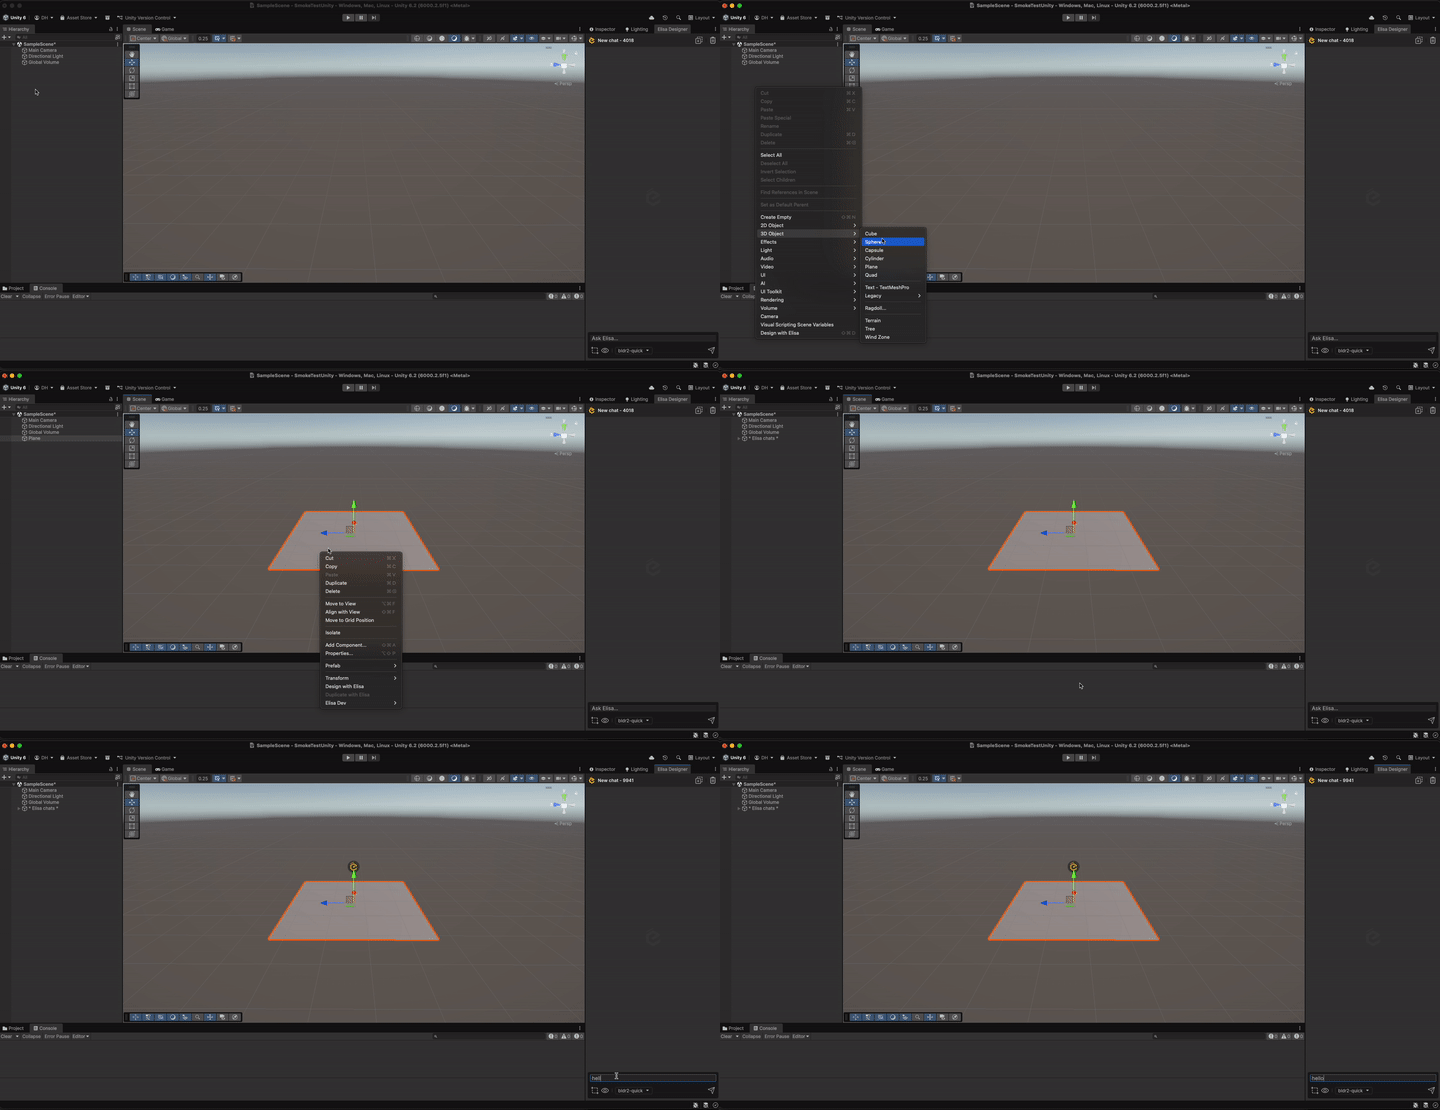
**Élisa uses surfaces** to create layouts. You can choose or place any suitable surface, such as a **plane**, an asset, or a floor.
You can also select **multiple actors** as a single surface area. Elisa will treat them as one continuous layout region.
Right-click on your surface and choose: **Design with Elisa**
For more information on surfaces: [**Here**](https://docs.elisainteractive.com/essentials/working-on-a-surface)
# Having issues with catalog generation?
If you're using a free Gemini API key, it may be due to rate or token limits.\
👉[See common solutions here](https://docs.elisainteractive.com/troubleshooting/common-issues)
***
## 8. **Design with Elisa**
**Élisa uses surfaces** to create layouts. You can choose or place any suitable surface, such as a **plane**, an asset, or a floor.
You can also select **multiple actors** as a single surface area. Elisa will treat them as one continuous layout region.
Right-click on your surface and choose: **Design with Elisa**
For more information on surfaces: [**Here**](https://docs.elisainteractive.com/essentials/working-on-a-surface)
 ***
## 9. Send Your First Message
**Now it's time to create!** In Elisa's chat box, try typing:
`Add a cozy campsite with rocks, logs for seating, and a small campfire.`
Elisa will analyze the selected surface and start populating the scene with suitable assets from the catalog.
***
## 10. Switch Surface
You can create as many design sessions as you want!
**Design with Elisa on a returned asset** to nest a new design session. Or place new surfaces to start creating new layouts!
**Go back to previous sessions** and retrieve your **chat history** along with all of the elements Elisa placed, so you never lose anything you've worked on!
Learn more about how to [Work on Surfaces](https://docs.elisainteractive.com/essentials/working-on-a-surface)
***
## **✅** You're Up and Running with Elisa!
From here, you can:
* **Refine the scene** using the chat (e.g., `Add a surrounding forest`, `Make it spooky`, etc.).
* **Switch surfaces** and start new design sessions.
* **Upload your own catalogs**! (see [How to Generate your own Catalogs](https://docs.elisainteractive.com/essentials/generate-your-catalog))
Need help or want to explore further?
🌳\*\*For Free Asset packs, Check Here\*\*\
👉[Visit the Full Documentation](https://docs.elisainteractive.com/essentials/working-on-a-surface)\
👉[Check out the Discord](https://discord.gg/SsFncG7HwJ)
\*\*Happy designing!\*\*✨
***
## 9. Send Your First Message
**Now it's time to create!** In Elisa's chat box, try typing:
`Add a cozy campsite with rocks, logs for seating, and a small campfire.`
Elisa will analyze the selected surface and start populating the scene with suitable assets from the catalog.
***
## 10. Switch Surface
You can create as many design sessions as you want!
**Design with Elisa on a returned asset** to nest a new design session. Or place new surfaces to start creating new layouts!
**Go back to previous sessions** and retrieve your **chat history** along with all of the elements Elisa placed, so you never lose anything you've worked on!
Learn more about how to [Work on Surfaces](https://docs.elisainteractive.com/essentials/working-on-a-surface)
***
## **✅** You're Up and Running with Elisa!
From here, you can:
* **Refine the scene** using the chat (e.g., `Add a surrounding forest`, `Make it spooky`, etc.).
* **Switch surfaces** and start new design sessions.
* **Upload your own catalogs**! (see [How to Generate your own Catalogs](https://docs.elisainteractive.com/essentials/generate-your-catalog))
Need help or want to explore further?
🌳\*\*For Free Asset packs, Check Here\*\*\
👉[Visit the Full Documentation](https://docs.elisainteractive.com/essentials/working-on-a-surface)\
👉[Check out the Discord](https://discord.gg/SsFncG7HwJ)
\*\*Happy designing!\*\*✨