1. Create a New Unreal Engine 5 Project
Using the Epic Games Launcher, create a new Unreal Engine 5.5, 5.6 or 5.7 project of your choice. Launch the editor to initialize the engine files, then close the editor.Download and Install the Elisa Plugin
Start by downloading the Elisa Unreal Plugin:- Download 👉 Elisa Unreal Plugin ZIP.
-
Extract the plugin folder into your project’s
Pluginsdirectory.If the Plugins folder doesn’t exist, create it at the root of your Unreal project.

2. Request your Elisa API Key
You should have received your Elisa API key by email. If not, you can request access via the Elisa website.👉 Get your Elisa API Key Copy this key; you’ll need it in the next steps.
3. Get a Google API Key
Elisa uses Google for the included Landscaper agent:- Visit 👉 Google AI Studio.
- Sign in with your Google account.
- Create an API key.
4. Set your Elisa API Key
In the engine, open the Elisa Settings Panel.Edit > Project Settings > Elisa
Set your Elisa API Key there.
Then press Enter.
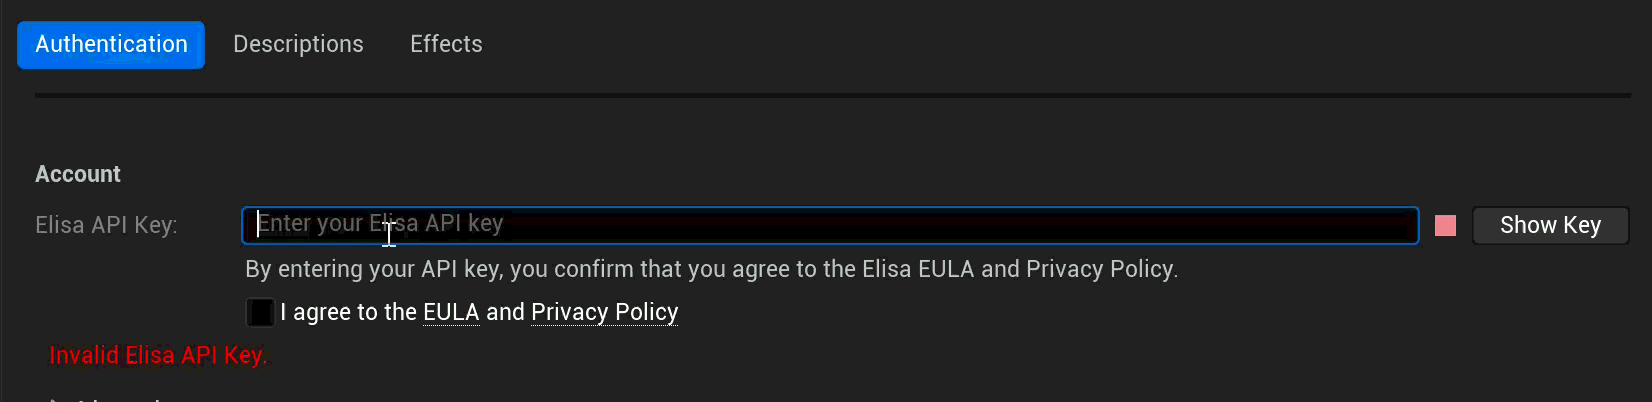
5. Set your Google API Key
Still in the ⚙️Elisa Settings, under the Google category, click Set yourGoogle API key.
Then press Enter.

6. Register a new Project
Still in the**⚙️Elisa Settings**, under the Project category, click theRegister a new Project button.
- In Project Description, fill in a Project Name, then press Enter.
- Once your project is registered, fill in the Description and press Enter.

The Project Description should include basic information about its type, style, and usage.
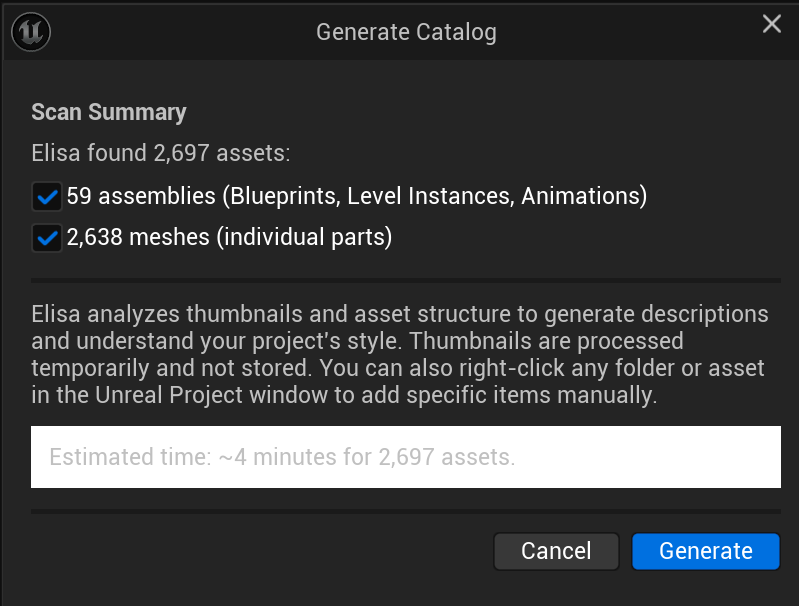
7. Generate Your Asset Catalog
Elisa needs a catalog of assets from your project in order to understand what it can place. A catalog links asset metadata to Elisa’s AI system.If you don’t yet have assets in your project, we recommend using the 👉 FANTASTIC - Village Pack.

- This should include key details about the assets style, theme, and intended usage.
Option 1:
1. Click the Generate Catalog button.

- Elisa scans your entire project files containing prefabs and meshes.
- Press the Generate button.
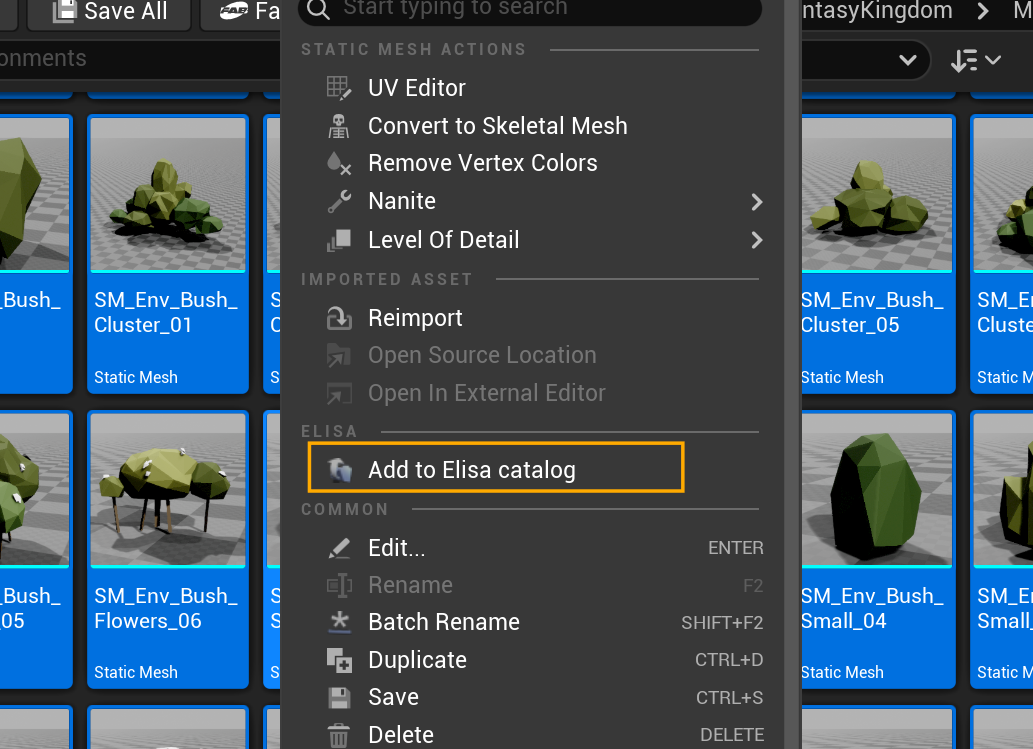
Option 2:
1. Select the assets you want Elisa to use.
- You can select multiple assets or even entire folders directly in your Project Files.
For more detailed information on what assets you can use, see the Selecting the right assets page.
2. Right-click the selection and choose Add to Elisa Catalog.
Having issues with catalog generation?
If you’re using a free Gemini API key, it may be due to rate or token limits.👉 See common solutions here
8. Design with Elisa
Elisa uses surfaces to create layouts. You can choose or place any suitable surface, such as a plane or a landscape. You can also select multiple actors as a single surface area. Elisa will treat them as one continuous layout region. Right-click on your surface and choose: Design with Elisa For more information on surfaces: Here
9. Send Your First Message
Now it’s time to create! In Elisa’s chat box, try typing:Add a cozy campsite with rocks, logs for seating, and a small campfire.
Elisa will analyze the selected surface and start populating the scene with suitable assets from the catalog.
10. Switch Surface
You can create as many design sessions as you want! Design with Elisa on a returned asset to nest a new design session. Or place new surfaces to start creating new layouts! Go back to previous sessions and retrieve your chat history along with all of the elements Elisa placed, so you never lose anything you’ve worked on! Learn more about how to Work on Surfaces
11. You’re Up and Running with Elisa!
From here, you can:- Refine the scene using the chat (e.g.,
Add a surrounding forest,Make it spooky, etc.). - Switch surfaces and start new design sessions.
- Upload your own catalogs! (see How to Generate your own Catalogs)
👉 Check out the Discord **Happy designing! **✨